Recently I set up Web Application Proxy (WAP) instances for a customer to support remote access to several on-premises web applications. I was looking for a cheap and effective means of ensuring the service continued to be available to clients in the event that one of the WAP instances went down. Someone recommended using Azure Traffic Manager (ATM) for this. ATM is cheap, especially compared to an external geo-load-balancer and, also being a Microsoft service, allows you to use Powershell to get things up and running as well as for ongoing administration. I found some useful on-line information on how to integrate ATM with WAP, but not all in one place and some of the information was out of date. Hopefully this article will help those to want to do the cut out the noise and simply get up and running quickly.
The first step is to create an ATM Profile. In this example I have used the DNS name wap.fish-eagle.trafficmanager.net. The wap prefix obviously refers to Web Application Proxy, while fish-eagle is my company name. The trafficmanager.net suffix is fixed and is common for all ATM DNS names.

Note that if you use the Azure Portal to create the ATM profile (as opposed to using Powershell), the routing method will default to Performance. This is fine if you have endpoints configured in different geographical regions and you want client requests to be directed to the nearest endpoint (WAP instance). In my case the WAP instances are both in New Zealand and share the same geographical region (from an Azure global perspective), so I changed the routing method to Weighted with an equal weighting. This means that neither instance is preferred and ATM will direct 50% of client requests to one instance and 50% to the other under normal circumstances. ATM monitors the endpoints and will stop directing clients to an endpoint it has detected as being offline. For a more in-depth discussion of the available routing methods, see this helpful article.
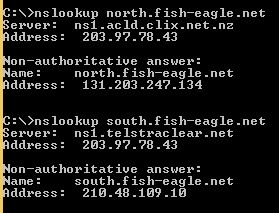
If you don’t already have public DNS A records for each of your WAP instances then this is the time to create them, as you will need them when configuring the ATM endpoints. In my example, I have created two records:
north.fish-eagle.net A 131.203.247.134
south.fish-eagle.net A 210.48.109.10
You will also need to create public DNS CNAME records for each of the web services pubished via the WAP and have these point to the DNS name of the ATM profile you created. In my example, it looks like this:
mywebapp.fish-eagle.net CNAME wap.fish-eagle.trafficmanager.net.
The ATM will not be able to furnish client requests with a suitable IP address until the endpoints have been configured, which is the next step.
When ATM was first made available it was only possible to configure Azure endpoints, i.e. those that existed in either Azure PaaS or IaaS. Recently, Microsoft has made it possible to also monitor endpoints outside Azure. These are referred to as external endpoints. Currently, external endpoints can only be configured using the Azure Powershell module.
After you have downloaded and installed the Powershell module, you need to log in with an account that has permissions to the Azure Resource Group in which the ATM profile has been created.
Login-AzureRmAccount
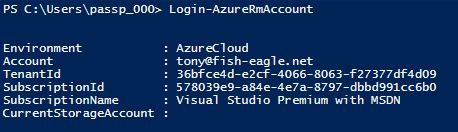
Choose the Azure subscription to use.
Set-AzureRmContext -SubscriptionId 578039e9-a84e-4e7a-8797-dbbd991cc6b0

Create a one-time registration to use the Microsoft.Network service provider.
Register-AzureRmResourceProvider –ProviderNamespace Microsoft.Network
![]()
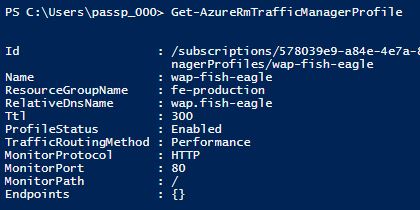
Get a list of your Azure Traffic Manager profiles (in my case there is only one). Note that currently no Endpoints are configured.
Get-AzureRmTrafficManagerProfile
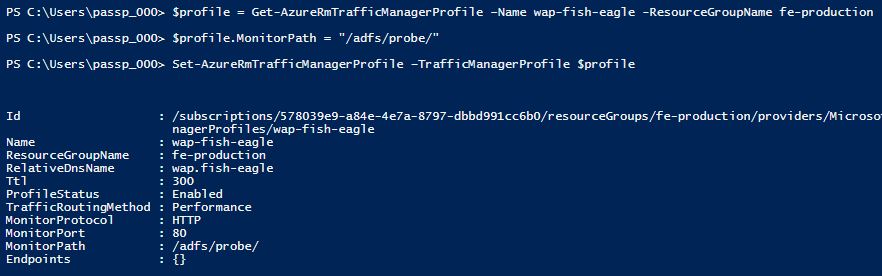
Retrieve the existing Traffic Manager profile object, set the MonitorPath and commit the changes. Note that the default monitoring path “/” has been known to have issues when monitoring WAP endpoints, i.e. ATM incorrectly detects them as Offline at times. The built-in “/adfs/probe/” path on the WAP servers can be leveraged to correct the aberrant monitoring behaviour.
$profile = Get-AzureRmTrafficManagerProfile –Name wap-fish-eagle -ResourceGroupName fe-production
$profile.MonitorPath = “/adfs/probe/”
Set-AzureRmTrafficManagerProfile –TrafficManagerProfile $profile
Change the routing method from Performance to Weighted (if you didn’t already do this in the Azure Portal during creation of the ATM profile), and commit the changes.
$profile.TrafficRoutingMethod = “Weighted”
Set-AzureRmTrafficManagerProfile –TrafficManagerProfile $profile

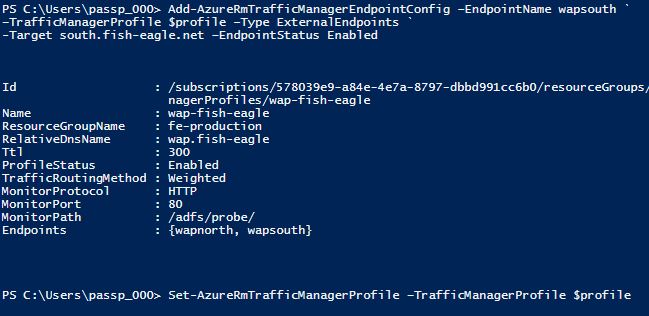
Create the external endpoints and commit the changes to the profile. Note that the value of the Target parameter in each cmdlet corresponds to the DNS A records we established earlier.
Add-AzureRmTrafficManagerEndpointConfig –EndpointName wapnorth `
–TrafficManagerProfile $profile –Type ExternalEndpoints `
-Target north.fish-eagle.net –EndpointStatus Enabled

Add-AzureRmTrafficManagerEndpointConfig –EndpointName wapsouth `
–TrafficManagerProfile $profile –Type ExternalEndpoints `
-Target south.fish-eagle.net –EndpointStatus Enabled
Set-AzureRmTrafficManagerProfile –TrafficManagerProfile $profile
Now when you run a DNS query for your web application(s) published through WAP, ATM should provide you with the IP address of one of the available (i.e. Online) endpoints. Here’s how mine looks.
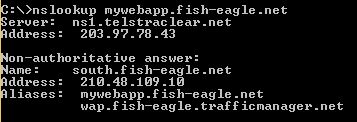
As you can see from the screenshot, ATM has provided the DNS client with the IP address (210.48.109.10), which corresponds to one of my WAP instances (south.fish-eagle.net).
At this point the configuration is complete. If both WAP instances are up and the monitoring is working successfully, you should see the monitoring status showing as Online in the Azure Portal.
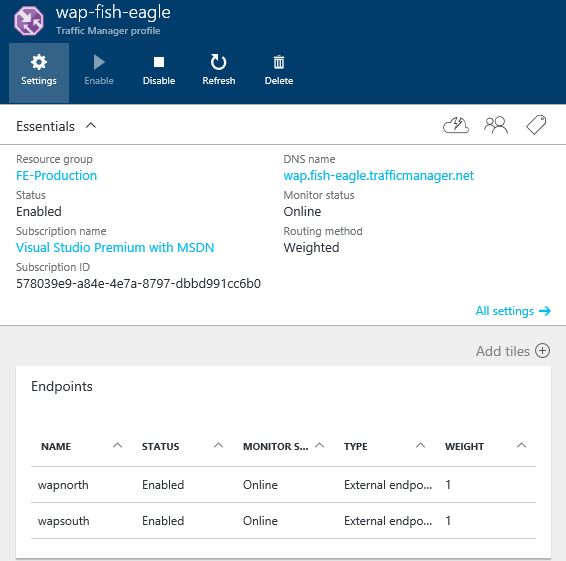
Note that you will need to allow inbound traffic on TCP Port 80 (HTTP) on your external firewall and WAP Windows Firewall configurations for the monitoring to be successful.
The setup of the ATM monitoring component should you take less than an hour. ATM provides a cheap and effective way to provide a seamless client experience for the web applications published via your WAP infrastructure.
Good luck and be careful out there!
Awesome article Tony. Much appreciated
FYI, this standard configuration of the WAP probe in Traffic Manager only tests the availability of the WAP server, not the ADFS backend. I came up with a workaround for this, using an alternative port on the WAP and then forwarding this to the backend probe: http://skrubbeltrang.com/fault-tolerant-adfs-setup/
I’ve tested it thoroughly and it works well, providing failover both when the WAP or the ADFS backend fails.